How to Add Web Push Notifications to a Next.js App
Web Push notifications have quietly become one of the most effective engagement channels on the web. They don’t require an email address. They don’t depend on social algorithms. And they work even when your website isn’t open.
If you run a blog, SaaS, e-commerce store, or internal platform, Web Push can dramatically improve retention and real-time communication.
Let’s walk through what Web Push actually is, how it works under the hood, and how you can implement it in a Next.js 16 application without turning your codebase into a mess.
What Web Push Really Is
Web Push is built on two browser standards such as Web Push API and Notifications API.
Together, they allow a website to send notifications directly to a user’s browser — even when the website is closed — as long as:
- The browser is running
- The user has granted permission
On desktop, it works in Chrome, Edge, Firefox and other Chromium-based browsers. On Android, support is solid. On iOS, it works only if the user adds the website to their home screen.
When implemented correctly, Web Push notifications appear just like native system notifications.
How It Works in Practice
The flow is simpler than it sounds.
A user visits your website. Somewhere in the UI, they see a toggle like “Notify me about new posts”.
When they click it:
- The browser shows a permission dialog.
- If they allow notifications, a service worker registers.
- The browser creates a push subscription object.
- Your frontend sends that subscription data to your backend.
- You store it in your database.
Later, when something important happens (a new blog post, order update, security alert), your server sends an encrypted message to all stored subscriptions. The browser receives it through the service worker and displays a system notification.
That’s it.
Where Web Push Actually Makes Sense
- Push notifications aren’t just for news websites. In fact, they’re useful almost anywhere.
- For publishing platforms, they’re perfect for breaking news, new posts, or topic-based subscriptions.
- For e-commerce, they handle abandoned cart reminders, price drops, flash sales, back-in-stock alerts, and delivery updates.
- For SaaS products, they’re great for trial expiration reminders, incomplete profile nudges, new comments, or account activity alerts.
- For transactional systems, they can deliver booking confirmations, payment confirmations, or appointment reminders.
They also work well in internal dashboards and intranet systems. The reach is enormous — and unlike email, the friction to subscribe is very low.
Adding Web Push to a Next.js 16 Blog
Let’s imagine a simple blog built with Next.js 16:
src/app/
├── (admin)
│   ├── admin
│   ├── globals.scss
│   ├── layout.jsx
│   └── layoutPage.jsx
├── (main)
│   ├── api
│   ├── globals.css
│   ├── layout.jsx
│   ├── page.jsx
│   └── posts
├── error.jsx
├── favicon.ico
└── not-found.jsx
It has a public frontend listing posts:

and an admin panel to manage posts:

Now we want to notify subscribed users when a new post is published.
The Toggle
On the frontend, we add a small component: a notification toggle.

// src/ui/components/NotificationToggle/NotificationToggle.jsx

"use client";

import { useEffect, useState } from "react";
import { usePushNotifications, registerServiceWorker } from "@/ui/hooks/usePushNotifications";
import clsx from "clsx";
import "./NotificationToggle.scss";

export default function NotificationToggle() {
  const { isEnabled, isLoading, error, toggleNotifications, isPushSupported } = usePushNotifications();
  const [showError, setShowError] = useState( false );

  const classes = clsx( "notification-toggle-container", {
    "toggle-loading": isLoading,
  } );

  useEffect( () => {
    // Register service worker on component mount
    registerServiceWorker();
  }, [] );

  const handleToggle = async ( e ) => {
    const checked = e.target.checked;
    const success = await toggleNotifications( checked );

    if ( !success && checked ) {
      // Reset the toggle to off position if subscription failed
      setShowError( true );
      setTimeout( () => setShowError( false ), 5000 );
    }
  };

  // Don't render if push notifications aren't supported
  if ( !isPushSupported ) {
    return null;
  }

  return (
    <div className={ classes }>
      <div className="notification-toggle">
        <label className="toggle-label">
          <input
            type="checkbox"
            checked={ isEnabled }
            onChange={ handleToggle }
            disabled={ isLoading }
            className="toggle-checkbox"
            aria-label="Notify me about new posts"
          />
          <span className="toggle-slider"></span>
          <span className="toggle-text">
            Notify me about new posts
          </span>
        </label>
      </div>

      { error && showError && (
        <div className="notification-error">
          { error }
        </div>
      ) }
    </div>
  );
}
// src/ui/components/NotificationToggle/NotificationToggle.scss

.notification-toggle-container {
  margin: 24px 0;
  padding: 16px 20px;
  display: flex;
  justify-content: center;
  align-items: center;
  flex-direction: column;

  background: rgba(255, 255, 255, 0.04);
  border: 1px solid rgba(255, 255, 255, 0.08);
  border-radius: 12px;
  backdrop-filter: blur(6px);
}

.notification-toggle {
  display: flex;
  align-items: center;
  gap: 12px;
  position: relative;
}

.toggle-label {
  display: flex;
  align-items: center;
  gap: 12px;
  cursor: pointer;
  user-select: none;

  font-size: 14px;
  line-height: 1.5;
  color: #e6e6e6;

  transition: opacity 0.2s ease;

  &:hover {
    opacity: 0.85;
  }
}

.toggle-checkbox {
  display: none;

  &:disabled ~ .toggle-slider {
    opacity: 0.4;
    cursor: not-allowed;
  }
}

.toggle-slider {
  position: relative;
  display: inline-block;
  width: 44px;
  height: 24px;

  background-color: #2a2a2a;
  border: 1px solid #3a3a3a;
  border-radius: 24px;

  transition: background-color 0.3s ease, border-color 0.3s ease;
  flex-shrink: 0;
  cursor: pointer;

  &::after {
    content: "";
    position: absolute;
    width: 20px;
    height: 20px;

    background-color: #ffffff;
    border-radius: 50%;
    top: 1px;
    left: 1px;

    transition: left 0.3s ease;
  }
}

.toggle-checkbox:checked ~ .toggle-slider {
  background-color: #1677ff;
  border-color: #1677ff;

  &::after {
    left: 21px;
  }
}

.toggle-text {
  font-weight: 500;
  color: #f0f0f0;
  flex: 1;
}

.toggle-loading {
  font-size: 12px;
  color: #4ea1ff;
  animation: pulse 1.5s ease-in-out infinite;
  pointer-events: none;
}

.notification-error {
  margin-top: 12px;
  padding: 10px 14px;

  background: rgba(254, 74, 73, 0.12);
  border: 1px solid rgba(254, 74, 73, 0.35);
  border-radius: 8px;

  color: #ff6b6b;
  font-size: 13px;
  line-height: 1.4;
  text-align: center;
}

@keyframes pulse {
  0%, 100% {
    opacity: 1;
  }
  50% {
    opacity: 0.45;
  }
}

@media (max-width: 768px) {
  .notification-toggle-container {
    margin: 16px 0;
    padding: 14px 16px;
  }

  .toggle-label {
    flex-wrap: wrap;
  }

  .toggle-text {
    width: 100%;
    margin-top: 8px;
  }
}

.notification-toggle-container {
  &.is-processing {
    opacity: 0.35;
    pointer-events: none;
  }
}
It uses a custom hook (usePushNotifications) that:
- Detects whether push is supported in the browser
- Handles subscription and unsubscription
- Manages loading and error states
If push isn’t supported, the component doesn’t render at all.
When the user enables notifications, the hook:
- Requests permission
- Registers the service worker
- Sends subscription data to the backend
The VAPID Keys
Push services (like Firebase Cloud Messaging used by Chrome) require authentication. That’s where VAPID keys come in.
They are a public/private key pair:
- The public key is sent to the browser during subscription.
- The private key stays on your server and signs outgoing push messages.
You generate them once:
npx web-push generate-vapid-keys
Then store them in your environment variables:
NEXT_PUBLIC_VAPID_PUBLIC_KEY="your_public_key"
VAPID_PRIVATE_KEY="your_private_key"
Without VAPID, your push requests will be rejected.
The Service Worker
Push notifications require a service worker.
You can place it in:
// public/service-worker.js

const VAPID_PUBLIC_KEY = "your_public_key";

// Handle push notifications
self.addEventListener('push', (event) => {
  const data = event.data ? event.data.json() : {};
  const {
    title = "Acme Blog",
    body = "Company news, product updates, and team stories.",
    icon = "/static/logo_512x512.png",
    badge = "/static/logo-192x192.png",
    tag = "posts-new",
    url = "/",
    data: notificationData = {}
  } = data;

  const options = {
    body,
    icon,
    badge,
    tag,
    requireInteraction: true,
    data: {
      ...notificationData,
      url,
    },
    actions: [
      {
        action: 'open',
        title: 'View Post'
      },
      {
        action: 'close',
        title: 'Dismiss'
      }
    ]
  };

  event.waitUntil(
    self.registration.showNotification(title, options)
  );
});

// Handle notification clicks
self.addEventListener('notificationclick', (event) => {
  event.notification.close();

  if (event.action === 'close') {
    return;
  }

  const data = event.notification.data || {};
  const urlToOpen = data.url || '/';

  event.waitUntil(
    clients.matchAll({
      type: 'window',
      includeUncontrolled: true
    }).then((clientList) => {

      const existing = clientList.find(
        (client) => client.url.includes(urlToOpen) && 'focus' in client
      );

      if (existing) {
        return existing.focus();
      }

      if (clients.openWindow) {
        return clients.openWindow(urlToOpen);
      }
    })
  );
});

// Handle notification close
self.addEventListener('notificationclose', (event) => {
  // Optional: Track notification dismissals
});
In a real project, avoid hardcoding values like the public VAPID key inside it. A better approach is to dynamically serve the service worker via a Next.js API route and inject environment variables.
This keeps your configuration flexible and production-safe.
Storing Subscriptions
When the user subscribes, your frontend sends a POST request to something like:
// src/app/(main)/api/v1/notifications/subscribe/route.js

import { postPushNotificationsModel } from "@/lib/models/index";

export async function POST( request ) {
  try {
    const subscription = await request.json();

    await postPushNotificationsModel.add( [
      subscription.endpoint,
      subscription.keys.p256dh,
      subscription.keys.auth
    ] );

    return Response.json(
      { success: true, message: "Subscription stored" },
      { status: 200 }
    );
  } catch ( error ) {
    console.error( "Error storing subscription:", error );
    return Response.json(
      { error: "Failed to store subscription" },
      { status: 500 }
    );
  }
}
The endpoint for unsubscribe may look like:
// src/app/(main)/api/v1/notifications/unsubscribe/route.js

import { postPushNotificationsModel } from "@/lib/models/index";

export async function POST( request ) {
  try {
    const { endpoint } = await request.json();

    await postPushNotificationsModel.remove( endpoint );

    return Response.json(
      { success: true, message: "Subscription removed" },
      { status: 200 }
    );
  } catch ( error ) {
    console.error( "Error removing subscription:", error );
    return Response.json(
      { error: "Failed to remove subscription" },
      { status: 500 }
    );
  }
}
Both dynamic routes use the PostPushNotificationsModel, which is responsible for inserting and deleting records in the database table.
export default class PostPushNotificationsModel extends AbstractModel {

  table = "post_push_subscriptions";

   async add( values ) {
    const sql = `
        INSERT INTO \`${ this.table }\`
        (endpoint, p256dh, auth, created_at, is_active)
        VALUES (?, ?, ?, NOW(), TRUE)
        ON DUPLICATE KEY UPDATE
          auth = VALUES(auth),
          is_active = TRUE,
          created_at = NOW()
      `,
      result = await this.query( sql, values );
    return result.affectedRow;
  }

  async remove( endpoint ) {
    await this.query( `DELETE FROM \`${ this.table }\` WHERE endpoint = ? LIMIT 1`, [ endpoint ] );
  }

};
A simple SQL table might look like this:
CREATE TABLE post_push_subscriptions (
  id INT AUTO_INCREMENT PRIMARY KEY,
  endpoint VARCHAR(500) UNIQUE NOT NULL,
  p256dh TEXT NOT NULL,
  auth TEXT NOT NULL,
  created_at TIMESTAMP DEFAULT CURRENT_TIMESTAMP,
  updated_at TIMESTAMP DEFAULT CURRENT_TIMESTAMP ON UPDATE CURRENT_TIMESTAMP,
  is_active BOOLEAN DEFAULT TRUE
);
When a subscription expires (which happens), push services return HTTP 404 or 410. Your backend should catch that and deactivate the record.
Sending the Notification
When an admin saves a post and checks “Notify about this post”,

the backend calls sendWebPushNotification, which comes from:
// src/lib/utils/notification/web-push.js
import webpush from "web-push";
import dbc from "@/lib/models/db";


/**
 * Truncate endpoint URL for logging
 * @param {string} endpoint - Endpoint URL to truncate
 * @param {number} length - Max length before truncation
 * @returns {string} Truncated endpoint
 */
function truncateEndpoint( endpoint, length = 50 ) {
  return endpoint.length > length
    ? `${endpoint.substring( 0, length )}...`
    : endpoint;
}

/**
 * Web push notification management
 */

/**
 * Initialize VAPID keys for web push
 */
export function initializeVapid() {
  webpush.setVapidDetails(
    "mailto:[email protected]",
    process.env.NEXT_PUBLIC_VAPID_PUBLIC_KEY,
    process.env.VAPID_PRIVATE_KEY
  );
}

/**
 * Build notification payload for posts
 * @param {object} post - Array of new post objects
 *
 * @returns {object} Notification configuration with payload and body
 */
function buildJobNotificationPayload( post ) {
  const baseUrl = "http://localhost:3000";
  const payload = JSON.stringify( {
    title: "New post on Acme Blog",
    body: post.title,
    icon: `${ baseUrl }/logo-192x192.png`,
    badge: `${ baseUrl }/logo-72x72.png`,
    tag: "post-new",
    url: `${ baseUrl }/posts/${ post.slug }`
  } );

  return { payload };
}

/**
 * Send notifications to all subscribers
 * @param {array} subscriptions - Array of subscription objects
 * @param {string} payload - JSON stringified notification payload
 * @returns {Promise<object>} Results summary
 */
async function sendToAllSubscribers( subscriptions, payload ) {
  const results = {
    successful: 0,
    failed: 0,
  };

  const RATE_LIMIT_DELAY_MS = 10;

  for (const subscription of subscriptions) {
    try {
      await webpush.sendNotification(
        {
          endpoint: subscription.endpoint,
          keys: {
            p256dh: subscription.p256dh,
            auth: subscription.auth,
          },
        },
        payload
      );

      results.successful++;
    } catch ( error ) {
      results.failed++;
      await handlePushError( error, subscription );
    }

    // Rate limiting
    await new Promise( ( resolve ) => setTimeout( resolve, RATE_LIMIT_DELAY_MS ) );
  }

  return results;
}

/**
 * Handle push notification errors and cleanup invalid subscriptions
 * @param {Error} error - The error object
 * @param {object} subscription - The subscription that failed
 */
async function handlePushError( error, subscription ) {
  const endpoint = subscription.endpoint;

  // Status codes indicating invalid/expired subscription
  if ( error.statusCode === 410 || error.statusCode === 404 ) {
    console.info( `Removing invalid subscription: ${truncateEndpoint( endpoint )}` );

    try {
      await dbc.query(
        `UPDATE post_push_subscriptions SET is_active = FALSE WHERE endpoint = ?`,
        [ endpoint ]
      );
    } catch ( dbError ) {
      console.error( `Failed to deactivate subscription: ${dbError.message}` );
    }
  } else {
    console.info(
      `✗ Push failed (${error.statusCode}): ${truncateEndpoint( endpoint )}`
    );
  }
}

/**
 * Send web push notifications about new posts
 * @param {object} post - Array of new post objects
 */
export async function sendWebPushNotification( post ) {
  if ( !post ) {
    console.info( "No post to notify about" );
    return;
  }

  try {
    // Initialize VAPID keys for authentication with FCM
    initializeVapid();

    // Build notification content
    const notificationData = buildJobNotificationPayload( post );

    // Fetch all active subscriptions
    const subscriptions = await dbc.query(
      `SELECT * FROM post_push_subscriptions WHERE is_active = TRUE`
    );

    if ( subscriptions.length === 0 ) {
      console.info( "No active push subscriptions found" );
      return;
    }

    console.info(
      `\nSending notifications to ${subscriptions.length} subscriber(s)...`
    );

    // Send to all subscribers
    const results = await sendToAllSubscribers(
      subscriptions,
      notificationData.payload
    );

    // Log results
    console.info( `✓ Push notifications sent: ${results.successful}/${subscriptions.length}` );

    if ( results.failed > 0 ) {
      console.info( `✗ Failed: ${results.failed}` );
    }

  } catch ( error ) {
    console.error( "Web push notification error:", error.message );
  }
}
Under the hood:
- VAPID is initialized.
- All active subscriptions are fetched from the database.
- A payload is built (title, body, icon, URL).
- Each subscription receives an encrypted push message.
- Failures are logged and invalid subscriptions are disabled.
The heavy lifting is handled by the web-push package:
npm i web-push
It encrypts payloads and communicates with push services properly.
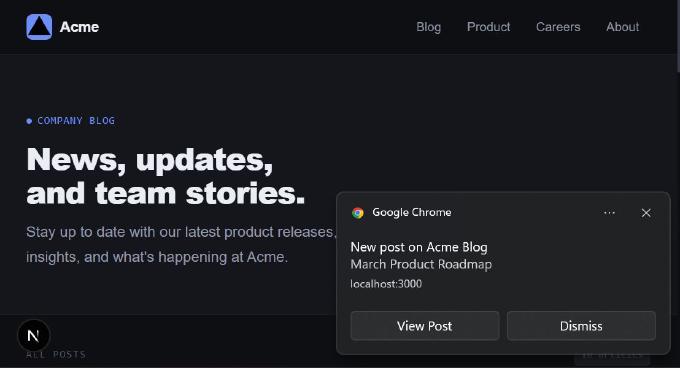
What Happens on the User Side
Once the push arrives:
- The service worker receives the message.
- It shows a notification using the Notifications API.
- The user sees a native system notification.
- Clicking it opens the relevant post URL.

From the user’s perspective, it feels instant and seamless.
A Few Production Tips
Web Push is powerful — but it can also be abused.
Some practical advice:
- Don’t request permission immediately on page load.
- Ask after meaningful interaction.
- Provide clear value (“Get notified about new posts” is better than “Enable notifications”).
- Allow easy unsubscribe.
- Monitor expired subscriptions.
- Always use HTTPS (Push API requires it).
Push works best when it respects the user.
Recap
Web Push notifications allow your Next.js application to send real-time updates directly to users’ browsers — even when your site is closed.
To implement it, you need:
- A service worker
- VAPID keys
- A subscription API route
- A database table to store subscriptions
- The
web-pushpackage to send encrypted messages
Once in place, you can use it for blog updates, e-commerce alerts, SaaS engagement, transactional messages, and more.
It’s not complicated. It’s not magic. It’s just a well-structured flow between browser, service worker, and server.
And when done right, it becomes one of the most effective engagement tools in your stack.