Migrating Legacy Apps to Next.js with Claude Code
Over the past year I migrated several legacy projects to Next.js with the help of Claude Code. Along the way I found a workflow that consistently produced good results, and it’s worth sharing because it saved a surprising amount of time.
Migrating functionality and content
Most of the legacy projects I worked on were PHP applications. Claude Code wasn’t just copying templates. It analyzed the legacy codebase, extracted business logic, content, UI components, and even parts of the admin interface, then rebuilt them as a clean Next.js application.
For this article I’ll use my own blog as an example. The current version is built with Hugo. The Hugo project is the source of truth for the layout, styling, JavaScript, and all of the content stored as Markdown files with images. The goal is to have Claude Code analyze those sources and build a fresh Next.js application that preserves the existing look and behavior.
The migration goes beyond rendering pages. I also want Claude Code to import all blog posts into a database and generate an admin UI so the content can be managed without touching Markdown files anymore.
Let’s assume the legacy project lives in /home/sheiko/projects/legacy.
The new Next.js application will be created in an empty directory: /home/sheiko/projects/blog
Inside that directory I add nextjs16-migration-agent-spec.md. This document contains the general architecture and coding conventions for the application. The migration prompt references it for everything outside the /admin section, so Claude Code has a consistent set of rules to follow throughout the project.
# AI Agent Spec: Legacy App → Next.js 16 (excerpt)

## Project Structure

~~~
src/
├── app/
│   ├── (main)/          # public routes, own layout.jsx
│   │   └── api/v1/[resource]/route.js
│   ├── (admin)/         # protected routes, own layout.jsx
│   ├── global-error.jsx
│   └── global-not-found.jsx
├── lib/
│   ├── store.js, features/*Slice.js   # Redux
│   ├── actions/         # Server Actions
│   └── models/          # DB access
├── ui/main/components/ComponentName/
│   ├── ComponentName.jsx
│   ├── ComponentName.scss
│   └── ComponentName.test.jsx
└── utils/session, api, security, ...
~~~

One component per folder. Never put components directly under `src/app/`.

## Server vs Client Components

Default to Server Components. Add `"use client"` only for hooks, browser APIs, event handlers, or DOM-dependent libraries. Push the directive to the smallest leaf component, never to a whole page or layout.

~~~jsx
// page.jsx: Server Component
export default async function ExamplePage() {
  const data = await fetchData();
  return <InteractiveWidget initialData={ data } />;
}
~~~

## API Routes

- Live under `(main)/api/v1/[resource]/route.js`, export `GET`/`POST`/etc.
- Validate the session first, return `401` if missing.
- Delegate logic to `src/lib/models/`; keep handlers thin.
- Consistent shape: `{ ok: true, data }` / `{ ok: false, error }`.

## Auth

- Session token in an HttpOnly cookie, read via `next/headers` `cookies()`. Never expose it to JS.
- Client only holds derived state (Redux `auth` slice), never the raw token.
- Auth mutations are Server Actions (`"use server"`).

## Code Style

- Double quotes, curly braces always required, `{ foo }` spacing in JSX.
- No `console.log` (warn/error/info are fine).
- No TypeScript, JS + PropTypes.
- SCSS: `@use`, not `@import`; BEM-like naming (`.card__title`, `.card_featured`).

## Anti-Patterns

- No `getInitialProps`/`getServerSideProps`.
- No client-side calls to external APIs, proxy through `/api/v1/`.
- No session tokens in `localStorage` or React state.
- No unnecessary abstractions or explanatory comments.
I also add admin-ui-agent-spec.md. This specification defines how the CMS under /admin should be built. Once the migration prompt references it, every generated admin screen follows the same structure and conventions. Instead of repeating UI requirements in every prompt, you review and refine the specification once, and Claude Code applies it consistently across the entire admin area.
# AI Agent Spec: Admin UI CRUD Interface (excerpt)

Internal framework: Next.js App Router + Ant Design + Redux Toolkit + a custom REST client/model layer.

## File Structure (per entity)

~~~
src/
├── app/(admin)/admin/[section]/[entity]/
│   ├── layout.jsx     # fetches table data server-side, renders Table
│   ├── page.jsx       # returns null
│   └── [id]/page.jsx  # fetches one record, renders EditModal
├── lib/
│   ├── api/admin/[Entity].js      # REST connector (client-side)
│   └── models/admin/[Entity].js   # DB model (server-side)
└── ui/admin/components/Main/[Section]/[Entity]/
    ├── [Entity]Table.jsx
    └── [Entity]EditModal.jsx
~~~

## Model

~~~js
import AbstractModel from "./AbstractModel";

export default class TagModel extends AbstractModel {
  table = "tag";
}
~~~

Extend `AbstractModel`, set `table`, add custom query methods only if needed. Base class already provides `findAll`, `find`, `add`, `update`, `remove`, `removeSelected`.

## API Connector

~~~js
import AbstractAdminRestClient from "./AbstractAdminRestClient";

class TagApi extends AbstractAdminRestClient {
  collection = "tags";
}

export const entityApi = new TagApi();
~~~

Always export the instance as `entityApi`: `UiTable` and `UiModalForm` consume it directly. Override `add`/`update` only when the payload needs shaping (e.g. `cleanDeep()`, `JSON.stringify()` on arrays).

## Table Component

~~~jsx
"use client";
import UiAdvancedTable from "@/ui/admin/components/UiTable/UiAdvancedTable";
import { entityApi as api } from "@/lib/api/admin/Tag";

export default function TagTable(props) {
  const columns = [
    { title: "Name", dataIndex: "name", sorter: true, getColumnSearchProps: "name" },
    { title: "Actions", key: "action", width: "120px", actions: "EditDelete" }
  ];

  return (
    <UiAdvancedTable
      columns={ columns }
      api={ api }
      enableSelection={ true }
      prefetchedData={ props.initialTableData }
      { ...props }
    />
  );
}
~~~

Use `UiTable` for simple lists, `UiAdvancedTable` when a column needs search.

## Modal Form Component

~~~jsx
"use client";
import UiModalForm from "@/ui/admin/components/UiModalForm/UiModalForm";
import { Form, Input } from "antd";
import { entityApi as api } from "@/lib/api/admin/Tag";

export default function TagEditModal({ pk, initialFormData }) {
  return (
    <UiModalForm pk={ pk } api={ api } initialValues={ initialFormData ?? { name: "" } }>
      { ({ onKeyDown }) => (
        <Form.Item label="Name" name="name" rules={ [{ required: true }, { min: 3 }] }>
          <Input onKeyDown={ onKeyDown } />
        </Form.Item>
      ) }
    </UiModalForm>
  );
}
~~~

`pk` falsy = create, truthy = edit. Use `transformInitialValues` / `transformFormData` to parse/serialize complex fields (arrays, JSON columns).

## Route Files

~~~jsx
// page.jsx: always returns null, layout renders everything
export default function EntityPage() { return null; }
~~~

~~~jsx
// layout.jsx: fetches list server-side, always force-dynamic
export const dynamic = "force-dynamic";

export default async function EntityLayout({ children }) {
  const initialTableData = await model.findAll();
  return (
    <>
      { children }
      <EntityTable initialTableData={ initialTableData } />
    </>
  );
}
~~~

~~~jsx
// [id]/page.jsx: fetches one record, renders the modal
export const dynamic = "force-dynamic";

export default async function EntityModalPage({ params }) {
  const { id } = await params ?? {};
  const initialFormData = id ? await model.find(id) : null;
  return <EntityEditModal pk={ id } initialFormData={ initialFormData } />;
}
~~~

## CRUD Flow

1. `layout.jsx` fetches `model.findAll()`, passes it to the Table as `prefetchedData`.
2. Add/Edit navigates to the `[id]` route.
3. `[id]/page.jsx` fetches `model.find(pk)`, passes it to the modal.
4. Modal opens pre-populated; submit runs `transformFormData` then `api.add()`/`api.update()`.
5. On success, the table refetches; the layout persists underneath the modal the whole time.

## Anti-Patterns

- No `"use client"` on layout/page files, they're Server Components.
- No calling `model.*` from client components, models are server-only.
- No fetching inside `UiTable`/`UiModalForm` via `useEffect`, always pass `prefetchedData`.
- Don't omit `export const dynamic = "force-dynamic"` on admin layouts and pages.
- Don't override base API/model methods unless the payload shape actually differs.
With the groundwork done, there’s nothing left to explain in the prompt itself. The project layout and conventions already live in the specification files, so the migration prompt can focus entirely on the task.
This is the prompt I feed to Claude Code:
# Project Goal (excerpt)

Migrate the legacy Hugo site at `/home/sheiko/projects/legacy` to Next.js 16 (App Router) + JavaScript (no TypeScript) + SCSS + MariaDB. Build the new app in the current directory, incrementally, staying runnable throughout.

## Source of Truth

The legacy Hugo project is read-only and authoritative.

- Reproduce existing functionality, content, URLs, and visual design as closely as possible.
- Modernize the implementation, not the design.
- Reuse existing assets (fonts, images, icons); preserve HTML structure and class names where practical.

## Frontend

- Extract reusable React components, follow App Router conventions.
- Prefer Server Components unless interactivity is required.
- Preserve URLs and SEO/Open Graph metadata.

## Content

Import all blog posts into MariaDB (design the schema), render pages dynamically, preserve all metadata (title, slug, date, tags, categories, excerpt, body, SEO fields).

## Administration

Build a CMS under `/admin` using Ant Design v5 (header + collapsible sidebar + content area), following `admin-ui-agent-spec.md`.

Auth flow: unauthenticated users see only the header and login page (no sidebar, no protected pages); after login, show the sidebar and go to the dashboard; after logout, return to login.

Seed an `admin_user` table with a default `admin`/`admin` account, password hashed with bcrypt.

## Database

Use dbmate for all schema changes, no exceptions. Never hardcode credentials, stop and ask for the MariaDB root password before any privileged operation.

## Development Rules

Follow `nextjs16-migration-agent-spec.md` for implementation details; it takes precedence over ad hoc decisions. If something can't be inferred from the legacy site or the spec, stop and ask rather than assume.
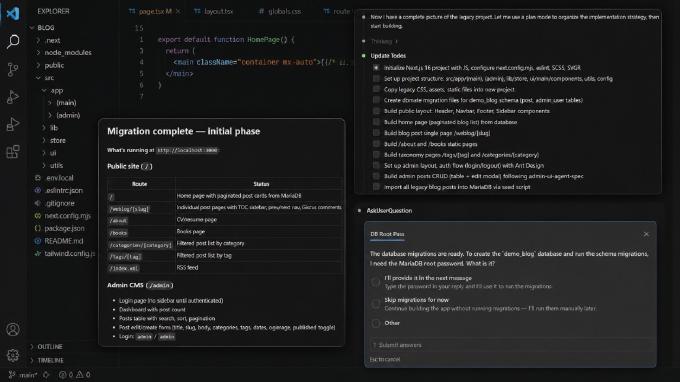
After you submit the request, Claude Code spends few minutes analyzing the project before it starts writing code. One thing I like is that it doesn’t immediately jump into implementation. It first builds a migration plan, so you can see whether it understood the task correctly.

Once the migration finishes, it prints a recap of everything it changed.

At this point it’s time to see what we actually got. Start the application with npm run dev and open http://localhost:3000.

The result was better than I expected. The original Hugo site uses fairly straightforward CSS and JavaScript, without old frameworks or deeply coupled frontend code. Because of that, Claude Code reproduced the layout almost pixel for pixel. I didn’t have to spend time fixing styling or chasing visual regressions.
The more interesting part is the CMS. Open http://localhost:3000/admin.

The prompt asked Claude Code to create temporary credentials (admin / admin), so we can sign in immediately after the migration.
Inside the admin panel there’s already a list of imported blog posts and a screen for managing administrator accounts.

Open any post and you’ll find all of the expected fields already mapped from the original Markdown content.

At this stage the project is already usable. The public site matches the original, the content has been imported into the database, and there’s a working admin interface for managing it. That’s a solid starting point for replacing the legacy application without spending weeks rebuilding everything by hand.
Visual regression
The Hugo example was almost too easy. Real migrations are rarely that clean.
Most of the time you’ll spend at least a few rounds fixing visual regressions, especially when the original application uses a larger design system, custom assets, third-party UI libraries, or a complex build pipeline.
A good example is the free CoreUI admin template. The source code is available from CoreUI Free Bootstrap Admin Template.
I cloned the repository into /home/sheiko/projects/coreui, started the application locally, and created a new empty Next.js project in /home/sheiko/projects/coreui-nextjs.
This time the prompt was intentionally simple:
Migrate the legacy application located at /home/sheiko/projects/coreui (http://localhost:3000/) into a new Next.js application (running on port 3003) in the current directory (JavaScript only).

The project at /home/sheiko/projects/coreui is the source of truth. Keep the new implementation as close as possible to the legacy application's design, styling, layout, and functionality while adopting modern Next.js architecture and best practices.
Just like before, Claude Code started by creating a migration plan.

Before settling on the plan above, it also summarized what the legacy template was actually built with.

The generated application looked convincing at first glance, but a side-by-side comparison immediately revealed problems.

For reference, here’s the original application:

The layout is mostly there, but several details are wrong. The sidebar icons are missing, some assets were not migrated correctly, and the logo SVG renders in black instead of white. None of these issues are difficult to fix manually, but they are exactly the kind of visual regressions that appear when migrating a non-trivial frontend.
This is where many developers stop and start patching things themselves. I prefer to keep Claude Code in the loop. It already analyzed the project structure and generated the implementation, so it’s usually faster to let it inspect the differences and iterate than to take over by hand. For a handful of issues I still point them out manually, but once the list grows, it’s faster to let Claude Code inspect both applications and iterate until the differences disappear.
A prompt like this works surprisingly well:
Make sure you have Playwright access.
Act as a visual regression engineer.
Open legacy page http://localhost:3000. Take screenshot.
Open Next.js page http://localhost:3003. Take screenshot.
List all visual differences.
Fix them one by one.
Repeat until only negligible differences remain.
The results depend on how complicated the application is. If most of the layout was migrated correctly, Claude Code can often eliminate dozens of small regressions over a few iterations without much guidance.
For larger projects I prefer giving it something even more objective. Instead of asking it to visually compare two browser windows, I add a small script called compare.mjs to the Next.js project. The script opens both applications with Playwright, captures screenshots, and generates a pixel-by-pixel diff image.
import { chromium } from "playwright";
import { PNG } from "pngjs";
import pixelmatch from "pixelmatch";
import fs from "fs";

const legacy = "http://localhost:3000/";
const next   = "http://localhost:3003/";

const b = await chromium.launch();
const [p1, p2] = [ await b.newPage(), await b.newPage()];
await p1.goto( legacy, { waitUntil: "networkidle"} ); await p1.setViewportSize( { width:1440, height:900 } );
await p2.goto( next,   { waitUntil: "networkidle"} ); await p2.setViewportSize( { width:1440, height:900 } );

// dev-server-only UI that isn't part of the app itself
await p1.evaluate( () => document.getElementById( "__bs_notify__" )?.remove() );
await p2.evaluate( () => document.querySelector( "nextjs-portal" )?.remove() );

// give client-side chart rendering (Chart.js canvases) time to finish drawing on both pages
await p1.waitForTimeout( 2000 );
await p2.waitForTimeout( 2000 );

const [s1, s2] = await Promise.all( [
  p1.screenshot( { fullPage:true } ),
  p2.screenshot( { fullPage:true } )
] );

// write screenshots + diff
fs.writeFileSync( "legacy.png", s1 );
fs.writeFileSync( "next.png", s2 );

const img1 = PNG.sync.read( s1 ), img2 = PNG.sync.read( s2 );
const width = Math.min( img1.width, img2.width );
const height = Math.min( img1.height, img2.height );

function crop( img ) {
  const out = new PNG( { width, height } );
  PNG.bitblt( img, out, 0, 0, width, height, 0, 0 );
  return out;
}

const c1 = crop( img1 ), c2 = crop( img2 );
const diff = new PNG( { width, height } );
const mismatch = pixelmatch( c1.data, c2.data, diff.data, width, height, { threshold: 0.1 } );
fs.writeFileSync( "diff.png", PNG.sync.write( diff ) );
console.log( `Mismatch: ${(mismatch/(width*height)*100).toFixed( 2 )}%` );
await b.close();
Now we need to fetch dependencies for the script:
npm install --save-dev playwright pngjs pixelmatch
npx playwright install chromium
and we can run it:
node compare.mjs

Mismatch: 1.22%
Then tell Claude Code: “Here is diff.png. The red areas are mismatches. Fix only the largest red region first. Re-run the script after each fix.”

Claude reports that it managed to downgrade mismatch from 1.22% to 0.52%.

Everything looks fine to me except the logo. To find out what is wrong I used a skill called css-style-sync, which lives at .claude/skills/css-style-sync/SKILL.md.
Recap
The pattern that keeps paying off: put the architecture and admin conventions in spec files up front, then let Claude Code turn a short migration prompt into a plan before it touches any code. That’s what made the Hugo migration close to a non-event. The CSS and JS underneath were simple enough that the reproduction came out almost pixel perfect.
CoreUI was the more honest test. A single simple prompt gets you most of the way, but a template with hundreds of icons and Chart.js widgets will always leave regressions behind. Feeding Claude Code an actual pixel-diff image, instead of asking it to eyeball two browser windows, turns those regressions into a short, ranked list it can work through one fix at a time. If an SVG or icon-font mismatch survives that loop, the skill mentioned above is worth pulling in next.